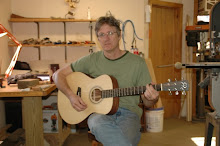
Sunday, November 30, 2008

Here's a scan of a painting that my mom gave me over the Thanksgiving visit when she and Roy drove from Cleveland to Maine! She's been staying in Cleveland (Euclid, I believe, to be exact) with Roy and he set her up with a small studio and some paint. She's gotten a lot more abstract lately. This one actually looks like a guy playing the bass, so I got it. It's only about 5" x 7" in real life and it's oil on paper.

She did about 12 of these little ones of various sizes and I guess I'll be posting those to the website soon. I just scanned this one with our little $100 HP printer/scanner and it came out pretty good.

Chris
Posted by Picasa

Wednesday, November 26, 2008

I put the strings back on my guitar after a week of hardening on the finish. I ended up with 3-4 coats on the back and sides with a couple of light rubs with a small amount of the tru-oil. The top has all kinds of scratches that you can't see unless you look really closely, but thems the breaks. I think I could do a better job next time, that's for sure.


And, it still sounds good and plays nicely, although I had been playing my Collings for a week with its shorter scale length (24.9") and when I picked up mine, it felt so much longer! (That's what she said, as my kids say....I would never say that!)

Now, to plot for the next one.

Chris
Posted by Picasa

Tuesday, November 18, 2008

Finish on the Back and Sides Finally

pic of guitar back
I finally got tru-oil on the back and sides (see above) after a semi-long process of pore filling with LMI wood filler, tru-oil sealer, more pore filling, more sealing, then sanding from 220 - 320 - 400 - 600 grit. Now I have a nice, smooth surface. I didn't fill the pores on the neck - for one thing, it was a bit of a pain to do, but mainly I like the look as it is.

The photo at the right is what the back looked like before I started this finish process. I'm using the directions from LMI which seem pretty complete to me. Not sure I'll get to the final polishing until after we get back from Thanksgiving in Maine.

Now, I'm waiting for the first coat of tru-oil to dry (about 2 hrs) so I can sand/buff and put on another one before bedtime.

over and out

Chris


Posted by Picasa

Saturday, November 15, 2008

Starting the Finish Process

Here's the guitar before finishing. I'm setting up a mini-shop in the basement so I can do the work. I had to wait about a week for LMI to ship the wood filler and tru-oil sealer. I'm going to start on the back, sides, neck on Sunday. Today, I cleaned up the top a little and put on 2 coats so far of the tru-oil. Because of the timing of the course in VT, we put some oil on the top already, but it still needs to be built up. I probably should do the back before I get too far into the top process, so I'll let this dry overnight and start with the sealer in the morning.

Most people see to think that the finishing process is a whole 'nother art form and it probably is. I can see scratches and dents all over the top of the guitar. You can't see them from a few feet away, but you certainly can under a light and at a good angle. Luckily, I think the back and sides are in pretty good shape, so maybe they will come out better.

I'll keep the blog posted on my progress as we go over the next couple of days. I want to get it done soon so it has time to cure before Thanksgiving, when I'll want to bring the guitar up to Maine for the holiday.


Chris
Posted by Picasa

Monday, November 10, 2008

Vermont Instruments Guitar Building Course – Week 3

Note: This entry and others on this blog reflect my own personal experiences at Vermont Instruments, taught by George Morris, during the weeks of October 11 – November 1, 2008. I left out a lot of the details of the process in order to keep this shorter and more for a general audience. There are plenty of good references available on making a guitar and guess what? Everyone does it differently!

You might want to read these posts first:
Introduction
Week 1 – making the parts
Week 2 – assembling the parts

“It’s fine, it’s fine.” – Adam.

An important aspect of the course is that George and Adam build a guitar right alongside you. All of the demos that George did to teach us were done on this guitar. I think this is effective in showing us how it’s done before we go hacking away at our own pieces of wood. After all, none of us had done any major woodworking to this degree before. (I had built opera sets and props before, back in the 80’s.) It was indeed humbling to watch the masters go to work so effortlessly, then try to emulate it, stumbling along like a baby taking his first steps. Was it me? My unsharpened tools? My technique? It turns out that sharp tools are key and practice makes for better control over the tools. Some things you just have to experience in order to discover what works or doesn’t work. And while decisions are placed firmly into your novice hands, it’s always good to look over to how George is doing something to get an idea of the right way – no sense in making a rookie mistake when tradition has dictated certain proven methods.

They were building a Gibson style dreadnaught with some rosewood that Adam had been saving for the right moment. It was quite stunning! It also had a bound fretboard and ergonomic body depth shape so it’s easier to play, but retains the same volume of air being pushed through the body. You can see it in the pictures below.
The top.The back and sides.
Finish Week
Week 3. Day 15. The final push. So close, yet so far. And so on. This is the week to pull it altogether. We knew our end goal was to get strings on the guitar by the end of the week, but just thinking about everything that was left to do gave me a headache. It’s best not to think about it and just do it, I decided.

There was a lot of scraping and sanding going on in the shop as everyone took off the ropes holding the bindings on and began the process of cleaning up. We spent all morning on Monday doing that. It had to be done sometime.

Lynn scrapes and sands his sides.

The real goal was to get the fretboards (a.k.a. fingerboards) glued onto the neck. Most people had already cut their slots in the board during week 2 sometime, but I hadn’t yet. It was pretty straightforward using the jig and template for my scale (25.4” for those counting at home) and the table saw. Then you use the drill press to cut 2 mm holes for the side position marks, also known as “the dots”. After that, you needed to use your posterboard pattern (again) and masking tape to mark where to cut the board to the proper shape. Hopefully, you were careful about measuring it the first week when you made it.

George demoing the fretboard cutting steps.

Once you had cut the shape, it was ready to glue to the neck using a special caul and a bunch of clamps. For us bolt-on neck people, you could do it off the guitar body, then while that was drying you could continue to work on the body very easily. You use a very thin layer of white glue for this so it would be easier to remove if a repair person had to do it in the future. Or as George joked to me, “That repairman might just be you, tomorrow!” Doh! A few of us stayed late to finish the gluing, including me and Jon. I got out of there by 9 pm that night after putting another coat of tru-oil on the top.

Fretboard glued to neck.

The next step in preparing the fretboard for actual frets is to “radius it”. That means that there is a very subtle curve to the board, which increases the playability of the guitar, especially for bar chords on the first couple of frets. And just to make matters more interesting, it’s not the same curve throughout the fingerboard. The Morris standard goes from a 12 inch radius at the nut end (first fret) to 16 inches at the 20th fret. You use a plane to take off material at the edges, carefully and not too much! Then a sanding caul that has the proper radius built into it helps get it down to the exact fit.

After putting in any face dots that you might want to have, then you can install the fret wire. It took me a little over an hour to put in the 20 frets. I’m guessing you could get faster at it over time. It gets very noisy in the shop during this process, so put on the ear protection. After the glue dries, it’s a real pain to get it off the board using an x-acto knife and carefully scraping. Moral of story: don’t use too much glue and don’t be messy with it. Some people use super glue but we used tite-bond on the edges where the fretboard is curved and the place where frets would most likely want to pop out.

George demoing frets installation on Jon’s guitar.

My fretboard with frets on it.

On Wednesday it was on to shaping the neck. I found this part to be most enjoyable, mainly because it worked out for me without a lot of angst. The method for turning a square chunk of mahogany into a nice playable neck was to mark out the desired shape onto your fretboard pattern at each end of the neck. At the end of the day, there’s pretty much nothing that is square on a guitar, it being all angles and curves. So the pattern will be different at each end as the fretboard widens toward the body. You start out with a circle and then modify from there, depending on whether you want a V-shape or a flatter neck. (The Martin is what they call a modified V, which is essentially a V on one side, from my understanding.) I just went with the standard roundness for my first guitar, although I like the feel of the Martins.

Once you have the neck shape on your paper pattern, and it’s been checked by George or Adam (there must have been some major errors at this step in the past for them to actually check your work), then you needed to transfer the same shape pattern to the actual wood. Again, you are working in 3-D, so you need to mark lines on both the bottom and side of the neck – this will determine where you will need to make your first facet cut in the neck. It’s probably hard to visualize through only words, so here are some pictures.

George transfers the pattern to the neck.

You can see the lines on the neck and the first cut with a rasp that follows the lines.

Using the spoke shave to carve the neck.

After the first cut is made.

Jon cuts the excess wood from his neck, following the fretboard.

You re-measure and follow this same process 2 more times, at least, and eventually you end up with a neck that follows the curve that you determined on the pattern. Then, it’s a matter of sanding and integrating the main neck with the headstock and heel so there is one continuous feel to it. That actually took me longer to get right because you are transitioning from two different planes of wood. This pretty much took the whole day to do, but it wasn’t our only mission that day.

My neck after shaving and sanding.

Before we could do any stringing of guitars, we needed to make and glue the bridge. Since this is where all the stress of the strings goes, you can’t mess around with it and it’s good to let it dry over night. Therefore, working back from Friday, we needed the bridge on by Thursday sometime. I think George wanted it on Wednesday, but we were too slow getting them cut out and sanded, ready for gluing. I was certainly in the shop until 11 p.m. finishing the bridge and adding another inlay of rosewood where the neck meets the body.

By 10 a.m. on Thursday, I had glued on my bridge. My rookie mistake of the day was to try to clean the glue off from around it using a spare wooden stick and poster board, which put some nasty scratches in the top. When I confessed to George, he said, “The perfect police will be by later today, too,” which made it seem not too bad, although I hate it when I do stuff like that.
Getting the bridge into position on Tom’s guitar.

While the bridge was drying, you could work on the fretboard and make your saddle and nut. This took most of the rest of the day. The idea was to get the frets themselves into playing shape by leveling them and filing them round. This is essential for playability and to prevent fret buzzing that will show up when the strings are on.
Lynn filing his frets the old school way.

Meanwhile, Adam had set up the 2 tenor guitars that George had made that were hanging around the shop. One was walnut and one was mahogany. He also did some experimenting with different bracing on the back, using a lattice bracing on the walnut one. Oh, man, those little guys were loud!
George and Adam compare tenors.

Thursday night I spent more time in the shop. By this time, we knew what needed to be done to get to completion by Saturday. For one thing, my neck needed more work to make those transitions to the heel and headstock right. You need good definition at the headstock and while I was following the Martin style at the bottom, it just wasn’t well defined yet (or straight, for that matter!). I worked on that for awhile with a rasp to get it right and I’m glad I did.

I also cut out some the mother of pearl for my headstock inlay I had planned. I was the only one of the group who was going to attempt this and time was running out. I was determined to get this done, not only for aesthetics reasons, but simply to learn how to do it. More on that later… I got out of there by 10:30 p.m.

I can tell that Friday was a frenzy of activity, because I have absolutely zero notes in my notebook, except what we worked on that day. It was setup day. The next scary operation was to route the saddle channel into the bridge. This is done last so that you can make absolutely sure where it should be based on the perfect intonation. This accounts for any (ahem) “variation” that may have occurred during the building process. You simply cannot get it right any other way than to put on a temporary saddle, add some strings and move it around until it’s in the right place and in tune.
Cutting the saddle slot with the router.

I couldn’t even start the intonation dance until I had checked that the neck was bolted on straight in all its variations. Fortunately, mine was perfect and I didn’t have to do a thing to it! Others with bolt-on necks were not as lucky. Lynn and Brennan had to work on removing minute areas of the neck, painstakingly, until they got it right. That is the problem with bolt-on necks – it took them literally hours of adjustment work before the neck was properly aligned and ready for the next step. I guess the good news is that now they are experts in that area, whereas I am not.
Lynn adjusting for the perfect fit.

Finally, I could string my guitar up and actually hear it for the first time. Jon had already done his on Thursday. Adam walked me through each step. It’s very exciting. Everyone gathers around and wants to play it. We’ve been living with these pieces of wood for almost three weeks already, so hearing what they sound like is quite satisfying.
Putting on the last string.

It works! There’s a happy guy.

Tom got his going after lunch.Jon had his strings on by the end of Thursday.
Brennan strings his OOO by the afternoon.A tired but determined Lynn picks out a tune.

Adam rocks out on the tenor guitar!!

I must say that all of the guitars sounded loud and even across the full range of the instrument. The bass was resonant – I could really feel it in the body. The highs were ringing. I still can’t believe how good it sounds and how playable it is. I keep picking up one of the other guitars I have (the Martins or Collings) for comparison and to me, my new guitar compares favorably to those. Of course, fresh guitar will only get better over time and I can already hear it changing as it settles in. Time will tell.

Now that the strings were on, it was time to take it all apart again! There was more finish work to do. For instance, after getting the saddle intonation exactly right, you had to file it and sand it. Also, I still needed to do my inlay and get a first coat of tru-oil on the back and sides. However, there was certainly light at the end of the tunnel and I knew we would all have playable guitars from this adventure. I spent another night in the shop to finish cutting my inlay so I would be ready to do it on Saturday morning before the course was officially over. I think everyone was in the shop until about 10:30 p.m. doing various finishing activities.

My guitar back in pieces. You can see the inlay cutting jig in the vise in the foreground.

On Saturday, I started the inlay process. It took me four hours, but I’m glad I did it for the experience – plus, it turned out really well. I can see why some folks don’t necessarily like to do the inlay part, although I enjoyed it. You use a jewelers saw to move the piece through the pattern you are cutting, keeping the saw moving up and down at a steady pace. It’s not hard to do, but it is time-consuming, Like other parts of guitar building, this one cannot be rushed. That’s why I cut the inlay over the course of a few nights instead of all at once.

A good tip from George was to make sure that the inlay cut was perfectly, because that’s what will show up on the guitar. Any mishits with the router when cutting the channel could be filled in with epoxy or superglue/ebony dust. I spent an hour or more of sanding and filing on Saturday to get the edges straight and true on the one hand and curvy on the other hand. No jaggies for me at this point. Using the dremel router to cut the channel was challenging but certainly do-able if you didn’t rush it.
Inlay outline on the guitar headstock.Channel routed in the headstock at the right depth.
Mother of pearl inlay with epoxy.And after sanding the epoxy.

When I had finally got the inlay done, I could put it all together again before heading back to Boston. There was no way I was going home with a guitar in a bunch of pieces.

Back together again and one tired builder.

I had to pack quickly and get going because we had BSO tickets that night. I said my good-byes, got my case, and made one last stop at Baker’s for snacks for the ride. I had a million thoughts running through my head as I drove back to Massachusetts, reflecting on the weeks that suddenly had just come to a close.

I made it home by 5:30 p.m. after an exhausting, exhilarating, exciting, energizing, and intense experience. It was a great group to work with and excellent teachers in Adam and George.
Tom, Jon, George, Brennan and sculpture, Adam, Chris, Lynn.

Next up, an epilogue with final thoughts.

Chris

Friday, November 07, 2008

Vermont Instruments Guitar Building Course – Week 2

Note: This entry and others on this blog reflect my own personal experiences at Vermont Instruments, taught by George Morris, during the weeks of October 11 – November 1, 2008. I left out a lot of the details of the process in order to keep this shorter and more for a general audience. There are plenty of good references available on making a guitar and guess what? Everyone does it differently!

You might want to read these posts first:
Introduction
Week 1

“Our interest is in training the next generation of luthiers. Put another way, we are not going to help you build a guitar, we are going to teach you how to teach yourself to build guitars.” – Vermont Instruments website.

Assembling the Parts - Week 2
We were right on schedule as we started up again on Monday – at least I thought we were on schedule, but what do I know? We had made our initial choices with regard to wood, body size, scale length; choices we were going to have to live and learn with for this first guitar. Those choices certainly have consequences once you string up your guitar for the first time and hear it, but I am getting ahead of myself. We have to make “the box”, from all those parts we made last week.

George would joke about having a ceremonial burning of the guitars at the end of the course. (I think he would have done it, too, if he could have gotten away with it.) The point is that the course is not about the guitar you are building, it is about the learning that takes place. We, as students, invest a lot of time into thinking about that “first one” and we become quite attached to it. But we shouldn’t get too attached. We know that. We can’t help it. It is a good reminder that this is your first guitar and not your last.

The first lesson of the week was on carving the heel block. That’s the piece of wood that attaches the neck to the body. In the bolt-on neck, there are two pieces – one glued to the neck and one glued inside the body. The piece on the outside is the heel and usually gets a carving treatment for both aesthetics and playability on the upper frets. There are a variety of designs here, but the basic idea is to have a smooth transition from the neck to the heel.
George demoing heel block shaping.

Heel design was one of those things that I never really thought about before. Decisions, decisions. I checked out my Martin D-18 back at our house. I checked out some plans in the shop for a dreadnought style guitar – a.k.a. a Martin. For most of us, it was difficult to visualize how you were going to get from the block of wood to a smoothly carved heel, but there was a method. Basically, you make a few rough cuts on the band saw along different dimensions to get close to where you need to be. Since you are working on 3 dimensions at once, you need to break it up into different planes and only work on one plane at a time, using a rasp or chisel.

Picture 4955 – first cut on heel block
My first cut on heel block.

Mark the lines to carve and follow them.

Sometimes you have to make lemonade from the lemons you, ahem, cut.

We started working on our headstock too. Not everyone was on the same pace, but the idea was to get the headstock cut out and holes drilled for the tuning machines. This happened over the course of a couple of days. We knew we had to get the neck prepared for assembly, so in-between other work, you could work on the heel carving or headstock. I can tell you I was never so tense as when I was cutting the holes for the tuning machines on the drill press. I held onto that neck for dear life!

Holes drilled in the headstock.

Some folks “missed” and had to plug the holes with dowel and do it again. Another lesson, hard-earned – you can always recover in some fashion; it’s either a do-over or an opportunity for a design decision to cover up a miscalculation or rogue router bit. But I’m not telling where those are. What happens in the shop, stays in the shop.

By Wednesday, we were ready to start on the multi-day process to prepare to glue sides to top and back. For the bolt-on neck people, this meant a number of steps designed to get the neck block on the inside of the guitar to line up with the neck itself and bolt on straight. You also need to prepare the sides for gluing, making one side flat and true, for the top, and the other curved to match the back curvature. Finally, you chisel away at your braces to make room for the sides and a perfect fit.

Jon and Tom got to glue there tops on right away because of the traditional neck arrangement they were using.

Adam helps Jon line things up for gluing the top.


I had to stay after school and finished up by 9 that night. This was an exciting day, however, because the guitar was starting to look like a guitar now.

My sides glued onto the top.


The next day, we got to take off the clamps and get ready for the back gluing.
Here are a few pictures of some happy builders.

JonTom

BrennanLynn

Yours truly.

The only thing you have to do to get ready for gluing the back is to plane down the sides and sand them at the right angle using a big curved board with sandpaper on it. Remember, the back is arched, so you can’t just slap it on willy-nilly. In addition, you should do a sanity check on the neck angle to the top (at the bridge) and adjust with shims while you are gluing. I had to shim my neck a bit, as did the folks with the traditional neck attachment.

Lynn, Brennan, and I had to come back after dinner to finish gluing the top. George met us there to supervise this important (and permanent) operation.
Back glued to the sides now.

We now have a complete box with a neck!

On Friday, we spent some time getting our tops ready for the first coat of finish. Normally, you’d wait on this until all the woodworking is done, but because of our accelerated schedule, we had to start on it. Before finishing, you mask off the area where the bridge is going to be glued, since glue won’t stick to finish too well and the bridge area is the most stressed part of the guitar. You simply get your poster board pattern out and line it up on the fretboard to find the bridge placement. Now you see why getting that correct in the beginning starts to matter.
Tom’s guitar with the poster board pattern to find the bridge location.

Lynn applies tru-oil to his cedar top.

I think everyone will agree that the scariest of the scary, stressful, intense steps is routing the binding channels. The bindings are those little strips of wood or plastic that go around the edges of the top and back. You must respect the router! I already had two incidents where the router “got out of hand” and put some dings in the wood – you can’t get that wood back, folks (but you can make a design decision around it, hee hee). To route the binding channels, you have to take a router with a special jig on it and run it around the entire body of the guitar. After that is done, if you have any purfling (little strips of wood that appear on the top or back, these help to demarcate the edges of the guitar) then you have to do it again with a different depth setting.

George demos the router.

My top after routing part way.

Once the channels get routed, it’s fairly straightforward to put the bindings and purfling in. You do want them to be tight and you can’t really clamp them, so George uses a bunch of rope to get things into place without glue first so you can cut the bindings to the exact size, then glue them on. You use 2-3 ropes to secure things in place, just don’t break the bindings like “someone un-named” did.
George helps Brennan glue on his herringbone purfling.

And so ended our second week of guitar building. We have a box that still resonates. We have the beginnings of a real neck and it attaches to our body. We have bindings on. Now it’s nothing but finish work – a fretboard, frets, neck shaping, bridge, inlay, scraping, sanding, finish coats, and set up (i.e. strings).
My back bindings are glued up and roped up.


I spent Sunday morning gluing my top bindings, then my wife and son came up from Boston and we went to Hanover, NH for lunch and to the food co-op to pick up supplies for the next week. Yikes! Only 5+ days to go and so much to do to get to a finished product. The good news is that everyone is progressing along at about the same pace and we can see that there is a finish line in sight.

Chris
Continue reading about week 3...
My commute...